Most hikers walk through the woods on marked trails. However, if you ever go off trail or do not have our bearings, you need some tools to assist us. The Suunto Compass is perfect for navigation off trail. If you are voluntary venturing off trail or are planning a back country trip, you should at least have a topographical map of the area and a compass.
Declination
Maps are orientated with true north at the top. However, a compass relies on magnetic north. True north equates to the north pole whereas magnetic north aligns with the Earth’s magnetic field. The distance (in degrees) between these points is called declination, and the difference in degrees varies by location and over time.
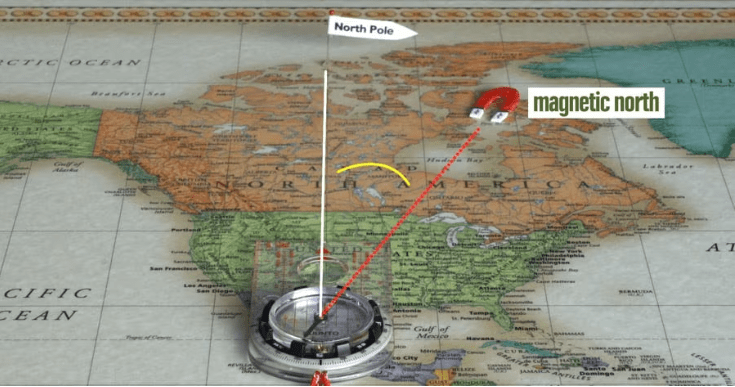
Topographical maps will list the declination in the legend. Keep in mind, declination will change over time and vary with location. So before adjusting the compass to account for this change, be sure to check the age of the map and make sure the map is appropriate for the location you are hiking. If you want to know the exact declination for your area or the area you’re hiking, just go to the NOAA Website and enter the desired zip code or longitude/latitude to get that information.
Included with your Suunto Compass kit is a lanyard and small metal key. If you turn the Suunto Compass over, you will see a screw, degrees ranging from -90 to +90, and a black arrow at 0 degrees. Turn the screw until the black arrow (declination arrow) aligns with the specific degree of declination. Make sure you are adjusting to the proper degree of East/West declination. Some maps will have an E (for East) or W (for West) with the declination. Other maps will use positive and negative degrees. A west declination will be expressed in a negative number and an east declination will be expressed in a positive number. If you are not using a Suunto Compass, check the instructions for how to set the declination. Once you set the declination, your compass needle will point to true north.
Navigating With A Map
Now that you have set your compass to the proper declination, you can use your compass to navigate. The shortest distance between two points is a straight line. To navigate using a map and compass, follow these steps: (Image and Step Credit to the Suunto Baseplate Compass User Guide)
Step 1: Open the map and place the compass between points A and B. NOTE: Ensure North is at the top of the map. The magnetic needle on the compass will be pointed north in the real world.
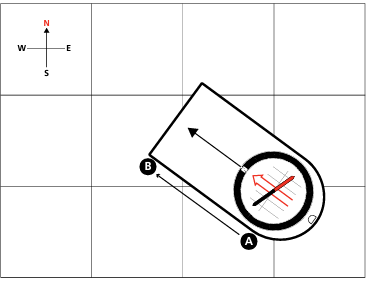
Step 2: The Suunto Compass has an adjustable baseplate. Turn the baseplate so the arrow outline aligns with the meridian lines running north.
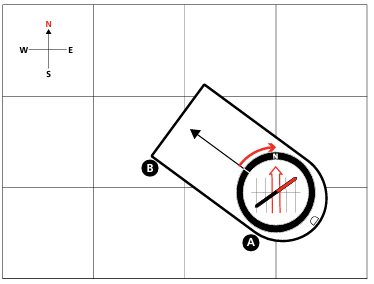
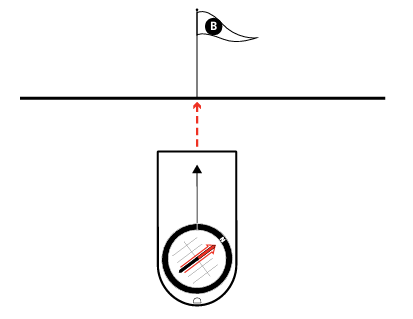
Step 3: Hold the compass at waist level and slowly turn until the needle pointing north aligns with the outline on the baseplate. The arrow at the end of the compass will point you toward your destination.
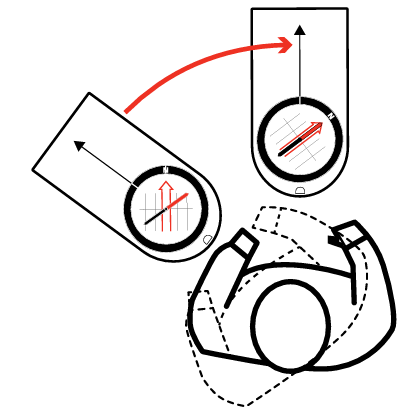
Step 4: Using landmarks in your surroundings (like a tree or rock) to ensure you’re still traveling in a straight line. Be sure to periodically check the map and make sure you are still on course and closing toward your destination.
Now of course this only works if you have a map and know your exact location. If you do not have a topographical map or do not know where you are, navigation can be a little more challenging.
Navigating Without A Map
If you do not have a map, navigating is a challenge, but not impossible. A map and compass will help you get from point A to point B. If you do not have a map, you cannot get from A to B. But, you can still navigate and keep your bearings.
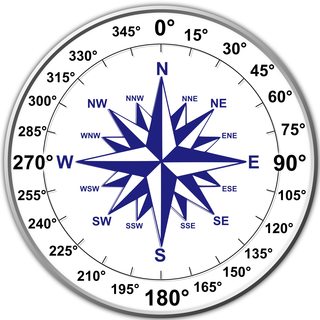
Around a compass head are degrees, these degrees represent directions. For example 90 degrees (090) points east, 180 degrees points south, 270 degrees points west and 0 degrees (or 360 degrees) points north. These directional degrees are called headings.
If you know the heading you want to travel, you can use a compass to guide you in that general direction. If you know you hiked north up a mountain, then you need to head on a 180 degree heading (south) to return to where you started.
Once you establish the heading you wish to travel you can begin to hike, using the compass to make sure you stay on the correct heading. The tricky part comes when you need to turn or change direction. There are two types of navigation techniques when it comes to compass navigation. These techniques are timing and pacing.
Timing is exactly what it sounds like. Timing how long you walked in a specific direction. However, this can be a challenge because you do not hike at the same pace all day. You might move slower over uneven terrain and faster across flat terrain. Pacing is much more reliable when hiking. Simply count the number of steps (paces) you took while walking a specific direction. If I walked on a heading of 090 (east) for 950 paces, then I need to walk on a heading of 270 (west) for 950 paces to return to my location. If I walked on a heading of 090 (east) for 560 paces then a heading of 045 (northeast) for 890 paces. To return I would need to walk on a heading of 225 (southwest) for 890 paces then a heading of 270 (west) for 560 paces to return to my location.
If you are unsure about how to identify proper headings, simply turn the baseplate so the desired heading aligns with the front of the compass. Next turn yourself so the magnetic needle aligns with the outline on the baseplate. Once aligned, you will now be facing your desired heading.
This technique does come with some problems. If I started my hike at the trailhead and walked a heading of 090 for 500 paces, there is no guarantee that I will return to the exact location in 500 paces. If I was returning to my car parked on a road, and I paced my proper heading (090 for 500 paces) back to the road and did not see my car, I would not know if I need to turn left or right to locate it. However, if I navigated to the road using the heading of 080 and did not see my car, I know I would need to turn right (Since a heading of 090 will always be slightly right of a 080 heading, just like a heading of 280 is always left of a heading of 270) and walk until I found my car. A slight purposeful miscalculation in navigating could help mitigate the risk of natural errors due to larger step size or uneven trails.
Navigation is a big part of making sure you stay safe while hiking. There are plenty of trails where cell service is limited or non existent. Some helpful tips for navigating include fixing on a specific object (like a tree or rock) will ensure you do not walk in a circle or drift left or right from your course. Always hike with a buddy if you are unfamiliar and tell a friend where you’re going and how long you’ll be gone. If you do find yourself lost in the woods, you’ll know some tips on making sure you find your way back!

References
- https://www.rei.com/learn/expert-advice/compass-declination.html
- https://americanhiking.org/resources/how-to-use-a-compass/
- https://gudgear.com/how-to-use-a-compass-without-a-map/
- https://www.backroads.com/pro-tips/hiking/how-to-use-a-hiking-compass
- https://www.ngdc.noaa.gov/geomag/calculators/magcalc.shtml#declination
